Disclaimer: This blog may contain affiliate links. I may receive a commission if you click a link and purchase something within this site. As an Amazon Associate I earn from qualifying purchases.

Tuesday, November 12, 2024

Garden Pest: Tomato Hornworms

Side Note: This is an old blog entry from another website of mine that I deleted. I decided to re-post it here because it fit the theme better than my other existing blogs. The original date of this post is sometime during the summer of 2011.  I'll also include the previous comment field that was attached to it, at the end of this post.

As I mentioned on my “Garden Season of 2011” post, I was doubting if I’d even put out a garden this year – especially since I was moving, in between two houses, getting a late start, etc.

Well, I ended up planting a corn field over at the other place I left that was for sale, and a small tomato patch at the new house.  Last year, the biggest garden pest I had was Japanese Beetles.  Those pesky little beetles were eating the corn silks and part of the ears last year, but I planted my corn later this year and, for whatever reason, I didn’t have a problem with ’em this particular growing season.  Actually, I figured they would be the type of garden pest that would get worse each year until I totally moved my crop to a different area.  Anyway...

This year, and for the first time in my gardening career, I have had problems with my tomato plants.  I’ve heard of cutworms or whatever, but I’ve never had dealings with Tomato Hornworms before!  Those bastards can really do some damage, as they are some serious freakin’ gluts!  Look below, for a couple pictures of those fat, green caterpillars with horns:


Yeah, they are fat, green, and have a red horn sticking out – near their bunghole region.  Of course, a lot of people may be looking for the “how to remove” advice, but I’m going to keep it short.  Personally, other than the enjoyment of working in a garden, I mainly grow the food I plant to have organic produce from fertile soil that, in return, has a full, rich flavor that you can’t find at your common grocery stores.  So, I manually remove these garden pests when possible and go ahead and accept the fact that some of my yield goes to the insects and animals, etc.  But what is left, will be totally organic.

Now, if you are a big fan of insecticides and poisonous sprays, I recommend that you get one that is especially formulated for caterpillars – if Tomato Hornworms are your problem.

These green, hungry devils eat like crazy; they eat the tomatoes and the plant itself.  It often looks like somebody went by and trimmed your plant with scissors.  However, they are not cutworms, but similar; cutworms usually cut your plant off close to the base.  To rid yourself of them, it is good to not let the weeds build up around your plants, which act as a breeding ground, till the ground as often as needed, and to place tin foil, cardboard, etc., around the base of your tomato plants.  Of course, there is insecticide for cutworms, as well; I just try to steer clear from poisons and chemical sprays.  Hell, if I wanted my garden to be full of chemicals, I’d just not ever plant anything and would buy all my produce at the local market.

Well, I mainly wanted to do a quick post over the Tomato Hornworm in case people are out there searching online using phrases like “these damn green worms are in my garden and eating my tomato plants,” etc.  If I would have kept a check on my tomato patch more often, I could have removed them quicker and less damage would have occurred.

At any rate, good luck with your crops!  Cheers!

Update (8-7-2012):  Due to a special request/question in the comment field, below is a picture of what the Tomato Hornworms ultimately turn into, which is a Five-spotted Hawk Moth:

---The original comment field, below:

Comment#1:

Nancy says:

July 1, 2012, at 5:54 pm

Thanks for solving the mystery for us of what kind of caterpillar ate the top half of our two tomato plants. My husband found it hanging on to one of the stalks one night, it was huge and looks just like your photo! I had looked for days and never saw him cuz his bright green color blended exactly with the leaves. I just must have overlooked him. He had a feast in the meantime…

Comment#2:

Amanda says:

August 6, 2012, at 7:12 pm

We found a HUGE one of these on our tomato plant today. It didn’t really eat much. Just one branch. Our son just loves all of nature and animal life and totally freaked when his daddy wanted to kill it. He insisted on carrying it to the opposite side of the road and letting it go in the cotton patch. He’s 6 and saw on the television that caterpillars turn into butterflies. Does this thing turn into a butterfly? If so, it may very well have a foot long wingspan given the size of the worm.

Comment#3:

Administrator says:

August 7, 2012, at 11:07 am

Tomato and tobacco hornworms are large caterpillars, up to four inches in length. The prominent “horn” on the rear of both gives them their name. They can quickly defoliate tomatoes, potatoes, eggplants and peppers. The adult of the tobacco hornworm is the sphinx moth. The five-spotted hawk moth is the adult of the tomato hornworm. Both moths are stout-bodied, grayish-colored insects with a wing spread of 4 to 5 inches. They’re not exactly pretty butterflies but are large and striking.

Thanks to your comment, I will add an image of what the tomato hornworm ultimately turns into, at the bottom of the original article. Cheers!

Comment#4:

Amanda says:

August 7, 2012, at 2:48 pm

Thanks for your reply and the pic of the moth. My son said it was “awesome.”

---End of the original comment field

Update: (11-12-2024): Since it has been over 13 years since I originally wrote this post, I thought I'd add a few tidbits about this creature, since I'm republishing it here. I will briefly talk about a crazy invasion I once had with tomato hornworms, an alternative solution for organic gardening (natural insecticide) to combat this green caterpillar, and a predator of this pest that you should always let thrive.

Tidbit #1 - A few years ago, I got lazy at the end of my garden season. I usually cut down the plants, clean up the garden area, mow, till again, etc., before waiting until the next year. Well, the tomato hornworms were bad that particular year, but I was so busy with work, I let them live instead of pulling them off, one at a time. By the end of the season, I decided I'd let them eat down all the plants to save me time cutting them all down. That was a mistake! Never do that! I'm not joking when I say this, but there was a time when there were so many of them out there, if I paused to listen, I could literally hear them eating! I spent way too much time the next year fighting them off of my tomato plants. My tomato hornworms kill-count was in the triple digits the following year, trust me...

Tidbit #2 - I've only used this a couple of times over the years, but there is supposedly an insecticide alternative for organic gardeners that are trying to fight certain types of garden pests like worms & caterpillars. It is a biological (bacterial) insecticide called "Monterey B.t." The active ingredient as listed on the package: Bacillus thuringiensis subspecies kurstaki strain SA-12 solids, spores and Lepidopteran active toxins (At least 6 million viable spores per mg).

Tidbit #3 - If you ever see tomato hornworms on your plants that seem motionless and are covered with little white things that look like rice, leave it alone and do not destroy anything. Those come from the Braconid wasps. They will lay their eggs on these particular garden pests and the larva will eat the tomato hornworms from the inside out. If left alone and the process completes, these Braconid wasps will get to reproduce. This will allow for even more of them to be out there to do the same thing again. They are probably the best natural predator for these things, overall.

Tidbit #4 - This is more of an observation than anything informative, but I have always noticed that the tomato hornworms that eat off of my pepper plants are always a darker green than the ones that eat the tomato plants. I can only assume the different nutrients affect the hue. 

Well, that about wraps it up for now...

---End of Post "Garden Pest: Tomato Hornworms"

Corn Plants Falling Down in the Garden?

Side Note: This is an old blog entry that I relocated here after I deleted another website of mine. The original date of this post is sometime around June of 2010. I will also include a few of the comments it received. Anyway...

This stuff happens, especially to the newbies. If you’re new to the garden scene and/or just simply would like to remedy this corn plant-related mishap, there’s a few things you can do to prevent this……

A beautiful field of corn plants basking in the sun...

The most common mistake made when planting corn, is by not putting the seed deep enough into the ground. Most packets of corn seed will instruct you to sow the seeds 1 inch deep, as this is not always enough; somewhere around 2 to 3 inches deep would yield stronger plants with a more stable foundation of root support.

Besides planting deeper, there is a couple more things you can do to help hinder the falling down of your corn plants. After your plants reach a height of 2 feet or more, and you have weeded out the weak sprouts, mound a pile of dirt around the base of each corn stalk. I’d suggest a nice, well-rounded pile of dirt, roughly 2 to 3 inches high. The main reason this helps, is because as your corn plants get older, they will start to develop anchor roots above the surface. By having a nice mound of dirt around the base, it will give them more to anchor into, etc. 

If all else fails and/or you’re enduring a bad season of high wind and hard storms, you could always drive stakes into the ground and tie them off - by securing the lower section of each plant. This is an easy solution, but would only be worth the effort in small, personal gardens. If you have a lot of corn, you’re better off planting them a little deeper to begin with, so you can avoid having to put in all the extra effort to prevent them from falling over. Of course, due to random weather conditions and bouts of strong gust, it is normal for some of your plants to get blown down regardless of preventive measures.

Fertilizing your corn: 

The wonderful corn plant is often referred to as a “nitrogen lover.” They utterly thrive in soil & fertilizer that has a high nitrogen content. Typically, for most vegetables, I select a balanced fertilizer such as 10-10-10 or use Miracle Grow supplements as 18-18-21. But for corn, it’s better to use pure ammonium nitrate fertilizer or Miracle Grow supplements as 24-8-16, for example. Although, you can never go wrong with using rich, organic fertilizer and compost for any plants within your garden.

Also, corn is very dependent on a regular supply of water. If you have a small to mid-size garden that you’re able to easily water, I recommend that you do so – to combat any sessions of drought that the hot growing season of summer often casts down upon thee. If corn doesn’t get enough water, it will not produce quality ears.

Good luck with your crop and take advantage of the garden season while it’s here in full swing……

If you do have good garden results, yield a lot of produce, and you lack the freezer room, you may need to invest in some good chest freezers, as well. Speaking of freezing, here is a post related to that, if you like squash: "How to Freeze Summer Squash for Frying Purposes."

The original comment field, below:

Comment#1: Farmer Joe says:

June 15, 2010, at 9:59 am

I hate it when that happens. I remember the first year I grew corn, having this problem. Mine would fall down on one side, since they were planted near a big, wooded hillside and would always lean towards the west for sunlight. I got lucky since I lived by a creek, and I toted medium sized rocks in 5-gallon buckets back and forth into the small corn field. I would surround the plant’s leaning sides with rocks for support. It was enough to get through the season, but the next year I planted them away from the hill that blocked a good portion of their light, and I also planted them deeper in the ground, like you have already mentioned. I suppose I could have used mounds of dirt around the base, but that year I was frustrated with them constantly falling down after each rainstorm and wanted something heavier like big rocks.

That was also some good advice on the fertilizer. Yep, that corn stuff loves the dang nitrogen more than anything I’ve ever grown. I also use a different fertilizer for my tomatoes, cucumbers, etc.

Comment#2:

Thanks for dropping by…

Yep, I’ve used rocks as well. But many of these spur-of-the-moment “quick fixes” can often be avoided, by simply planning ahead. Ahh, there is nothing like learning through experience, no matter what it is.

By the way, good luck on keeping your corn plants perpendicular this year; ’tis been stormy down here of late……

Comment#3:

Jessica says:

July 8, 2011, at 1:52 am

Hi. I was wondering if anyone can answer a curiosity question, I cannot answer.

What is the stuff that is small and on the top of the corn plant?

It looks like rice but it's not of course. But what is it and what do I do with it?

My daughter wants to know, and she keeps asking me and I do not like telling her I do not know. Moms are supposed to know all and see all but this I am stumped on bad. Help, HELP!

Comment#4:

Administrator says:

July 10, 2011, at 10:04 am

Hi, Jessica…

I was late getting to your question. This blog post is mainly about people having trouble with their corn plants falling down, leaning, etc., but the answer to your query is simple:

You are referring to the corn tassels. They are what pollinates the corn plants, hence forth the corn production. However, when people are trying to create hybrid varieties, they perform something called detasseling; it’s where they cut the tassels off of one particular variety in the field, to leave the grain open/available to get pollinated by another existing variety of corn plants that are growing in the field – to produce a hybrid corn variety.

Anyway, hopefully everybody is having a good corn crop this year and it is still standing strong. Those heavy rainstorms seem to be corn’s worst enemy during its first few weeks of growth. I had better luck this year, at least when it comes to the “falling down” problem, by planting later in the season and, of course, following some of the tips on this page.

Enjoy the rest of the garden season! Cheers!

---End of previous Comment Field

---End of Post "Corn Plants Falling Down in the Garden?"

Monday, November 11, 2024

Growing & Cooking Okra - The Health Benefits

Side Note: This is an old blog entry from a previously deleted website of mine. The original date of this post is sometime during the year of 2012. I decided to add it here [with some minor edits] because I thought it fit the theme better than some of my other existing blogs. Anyway...


 Whenever I mention Okra, there is usually somebody that will say something like this: “Say whaaa?  You eat Okra?  Eeew!”  Ha-ha!  But seriously, this stuff is really good, and I think more people would like it, if they’d just try it or perhaps cook it a few different ways, etc.

 I will say, at least in the U.S., Okra seems to be more of a “southern thing,” sort of like Fried Green Tomatoes.  One must remember, here in the south, we’ll batter & fry almost anything possible, hence forth the obesity problem at hand; LOL!

 At any rate, I just happened to think about this particular veggie today, when contemplating what I’m going to do for this year's garden season.  It seems that every gardening season is different for me, since I have moved several times of late.  This year I have limited space, and I’m thinking about getting the most out of my yard by doing something I have never done before, which would be planting in multiple sections and in strategic areas.  I mean, I planted in sections once before, when I had a big open field; I had 2 separate growing areas, but one of them was mostly a corn field

Now that I have a normal-sized yard without much room for a big garden, I’m going to have to get creative, to say the least.  Anyway, this post isn’t going to be highly informative or anything, just me rambling about cooking and growing okra along with a few of the health benefits it has, and so on…

Okra is extremely easy to grow and doesn’t have any special requirements that stand out.  If you can grow tomatoes and peppers, you should have no problem growing okra.  

Although many people recommend starting this plant from seed sown directly into your garden, some folks find it easier to just buy the plants small and transplant them into your garden.  Yes, it costs slightly more but it's your garden and if you want to take a shortcut, that's your business!  Some seeds are always better to sow directly into the soil, especially the large ones like corn, squash, zucchini, etc. [Edit: As time went by, I now always plant okra from seed instead of buying sprouts at a nursery. However, I still start some seeds in containers early and transplant later, then plant the rest directly into the soil as the weather warms up.]

I have read before that it is a good idea to rotate your okra crop (change locations) every year because they are very susceptible to diseases from the soil and those beloved garden pests. [Edit: Another reason would be that certain plants pull different nutrients out of the soil and so on. The use of cover crops during the off season is a great option to counter this, especially to replace the lost nitrogen. I once wrote about an excellent option for this, here: "Benefits & Reasons for Cover Crops - Crimson Clover"]

If you have fairly decent soil or use organic compost and whatnot, you will most likely not have to even worry about fertilizer.  Or you can take the easy way out (if you don’t use compost, etc.) and apply a small amount of miracle grow (or other types of fertilizer) a few times, when your plant starts growing larger – to insure a good yield.

It is a good idea to pick your okra at a small size, or it will be too tough to eat and the seeds in the pods will be quite large.

I usually pick it anywhere from 3.5 to 5 inches, albeit I have picked some a little larger and they still be tender – depending on how fast they grew.  Speaking of that, if you have a lot of okra plants and they start to yield, if you do not go out there every day and pick ’em, you’ll have green pods coming out of your bunghole!  Yes folks, they really produce quick, once they start to take off!

I’m not going to spend any more time talking about growing this easy-to-grow vegetable.  Now how about cooking these tasty delights?

Being from the south, I can tell ya right now, I prefer to batter them in corn meal and fry those suckers in oil.   I slice up a good mess, roughly 3/8ths to 1/2-inch slices, bread them with my batter & seasoning, and drop them in a preheated skillet full of canola oil. [Edit: I now use peanut oil as my go-to frying lipid.]

I have also boiled them in a mixture of water, soy sauce, and pepper seasoning, and they turn out great.  When I boil ’em, I keep the pods whole.  [Edit: Say what? When I don't batter & fry 'em, I now sauté the okra slices in a mixture of oil, water, Worcestershire sauce, black pepper, seasoned salt, red pepper flakes, onion seasoning, and a hint of sugar.] I have also pickled okra, although I wasn’t that impressed because it ended up tasting like pickles instead of okra, but whatever floats your boat!

There are many ways to use okra when cooking, not just the ways I mentioned above.  Many people put them in soups, stews, and stir-fry, as well.

Some people cook them with Lima beans, tomatoes and corn, which is something I believe they call “Okra Succotash.”

Now, what about those health benefits?

Like any organic vegetable that isn’t laced with pesticide and chemicals, it has obvious health benefits. …The usual vitamins, minerals, phytochemicals, antioxidants, blah, blah, and so on and so forth.

However, there is a distinct quality in okra that is really good for your digestive tract.  The slime or “goo” in okra is a very beneficial fiber and helps lubricate the large intestine.  Okra’s mucilage (that slimy or gooey stuff) binds cholesterol and bile acid which helps flush the toxins and excess cholesterol out of the body via your intestinal tract.

Okra has been known to help people with IBS (irritable bowel syndrome) along with other ailments.

Here’s a web page I just found online, that speaks about some of these health benefits in further detail:  https://www.pyroenergen.com/articles07/okra-health-benefits.htm

Well, enough about this okra subject.  Now I’m ready to fry some, but I don’t have any at the moment.  I look forward to growing some this year, though, along with several other things; good luck with your crops and enjoy the garden season this year.  Cheers!

---End of Post "Growing & Cooking Okra - The Health Benefits"

Sunday, November 10, 2024

Fried Green Roma Tomatoes

Side Note: This is an old blog entry from another domain of mine that I deleted a while back. The original date of this post was 7-6-2012. Even though this is a blog about wildlife & nature, I decided to add it here anyway since it sort of goes with the garden-related stuff, etc. Anyway...

I’m sure that many of you have heard about the southern tradition involving fried green tomatoes, but have ya ever tried ’em? Well, even if you have, I’m sure most of you have always used the standard full-sized tomatoes like Big Boy, Better Boy, etc. Hey, I’ve always did the same thing, because that is all I have ever heard people talk about, when concerning this blissful, fried dish of tomato madness.

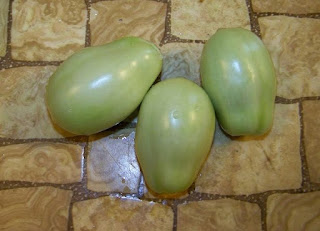
Well, the other day I got a little creative after realizing that a few of my tomato plants turned out to be Roma tomatoes. From there, I did a quick test-cook to see if there is a better alternative for fried green tomatoes. Oh, if you are wondering, Roma tomatoes are small, pear-shaped tomatoes that are often used in sauces and/or during cooking (also known as Italian tomatoes) because they are meatier and contain less seeds and juice. I don’t prefer them over the common, larger tomatoes when it comes to eating them in a ripe state or in salads, etc., because they just don’t have the juice and robust flavor like the others. But we are not talking about red tomatoes here…

Anyway, here is a quick snapshot of some green, Roma tomatoes, below:

Another reason why I decided to try this, is because I thought that the meatier Roma tomatoes would fare better when fried, as opposed to the traditional, large, juicy tomatoes. At any rate, I couldn’t help but notice that these smaller tomatoes would also be easier to maneuver and flip around in the skillet, sort of like when you fry squash, zucchini, and/or okra, for example (it’s obvious I’m from the south, eh?). But anyway, there is only one way to find out, right? So I started to slice these little devils…

After you have sliced ’em up in about 1/4th inch slices, it is now time to add the batter. Unlike most people, I choose against the whole “egg wash” hooey, as I have had the best flavor and texture when battering wet food directly into the batter, as opposed to using the pre-batter egg/milk dip thingy. Although I think my simple batter is the best in the world, you can use whatever type you desire. I prefer yellow corn meal mixed with a decent amount of seasoned salt, black pepper and a few tablespoons of sugar.

I suppose I could show an image of the battered & seasoned green Roma tomatoes, but I think you have a pretty good idea of what that may look like.

Well, it is time to cook, so have a large skillet ready with the oil of your choice (I currently prefer peanut oil), preheated of course, and fry those suckers until golden brown on each side. After they are done, drain on a plate with paper towels and season to taste with salt, pepper, hot sauce (even ketchup, if ya like) and/or whatever floats your boat.

To cut to the chase, the verdict is in: Roma Tomatoes, even though it may not be as popular, make for the best fried green tomatoes I have ever devoured. If cooked right, they almost seem like “tomato chips,” however that may sound. Hey, check out the finished product below: 

Side Note:  When I originally wrote this recipe, it was during the middle of garden season, and I had plenty of green tomatoes at the time. However, the other day, since it's wintertime, I applied this same cooking method to some store-bought Red Roma Tomatoes, and it still turned out good. They weren’t as firm, but still fairly tasty.  Since store-bought tomatoes are usually bland, I compensated by adding extra seasoning to the batter. Cheers!

Image Credits: My own photos.

---End of Post "Fried Green Roma Tomatoes"

Botfly Larva - Wicked Maggot

Side Note: This is an old blog post from a deleted website that I had in the past. The original date of this post was sometime during the year of 2010.

The Botfly, commonly spelled “Bot Fly,” also known as the torsalo and American warble fly, is about twice the size of a common housefly.

Its maggot larva are known to live as parasites in human flesh, along with other animals and whatnot. The Botfly’s larva burrows itself into the flesh and begins to consume body tissue while being able to breath air from its own backside (as odd as that may sound).

This wicked fly, is a sly little bastard, and often uses mosquitoes to transport their eggs, and when the mosquitoes bite a person, for example, the eggs are released onto the victim due to your body heat.

I recently stumbled upon this subject matter because we had several kittens born a few weeks ago and the mother of the kittens turned up missing, so we had to pay special attention to them. The runt of the bunch, which we named “Crummy,” had this sore on its neck and it seemed to be infected. 

My girlfriend put antibiotics on it and brought the cat inside. A couple days later, it seemed to get worse, and it had a swollen ring around the infected area. Well, one night, my girlfriend came running into the bedroom and woke me up. She said, “oh my god…you won’t believe this, something is living inside of Crummy!” She was totally freaked out and it took her hours to calm down. 

I looked at what appeared to be this bored out hole in its neck, and ever so many seconds this wormy looking creature would poke its head, ass, or whatever it was, out of the hole and quickly retreat back into Crummy’s neck. To make it short, my girlfriend kept pouring alcohol into the hole, since hydrogen peroxide didn’t seem to work, and it aggravated the Botfly Larva in such a way, it would start to poke out of the opening far enough so she could get some tweezers around it to pull it out.

This is how we come to realize what a Botfly and its larva looked like, and I learned even more about this parasite after searching online for more information.  I’ll provide some informative resource links, in a moment. [Edit: Since this post is at least 14 years old, many of the original resource links are no longer available, so I'll skip that part of the post.] But first, I’ll drop down a couple images…

Botfly Larva (maggot):


The Repugnant Botfly:

Update (11-10-2024): After looking back at this subject, years later, what I find odd about that whole ordeal was that the one called the "Human Botfly" were not that common in the United States back then nor are they now. They were mostly found in Central and South America and occasionally found on the southern tips of the U.S. However, after looking back into this subject, I read where we have a different species of this wicked maggot called the "North American Botfly" that lives in the United States, so maybe that was the type we found in that poor cat's neck back in 2010. However, in summary, no matter which type of species it was, to use unscientific terms, I would still classify that thing as "gross," to say the least. ---End of Update

Image Credit: en.wikipedia.org/wiki/Dermatobia_hominis

---End of Post "Botfly Larva - Wicked Maggot"

Saturday, November 9, 2024

Japanese Beetles - Garden Pest

Side Note: This is an old blog post from a domain I deleted in the past. I decided to re-post if here. The original date of this post was: 8-2-2010. Yeah, that was over 14 years ago, but these little pests are still out in this world, so I assume this subject is still relevant. Plus, I've added a helpful update at the end of this post. Anyway...

I’ve planted many small gardens over the years and have never had that many problems with pests. But this year, I grew my first large garden in an open field with loads of various plants including a separate area for a corn field. Well, everything was going just fine until late June when these clumsy, awkward, ugly, pesky Japanese Beetles started showing up.

Yeah, I was really impressed with their appetite, as they devoured the leaves off my Okra plants along with several other plant varieties. But what disgruntled me the most, is when they entered into the corn field. They love to eat the silks off the ears of corn and if they get to it early enough, it will devastate your yield. Luckily for me, I had planted so much corn that I still had a decent crop. The beetles didn’t affect the end result of the rest of my harvest, but what will they do next year?

I’m not one to use poisons and sprays, since the whole point of growing your own food, at least to me, is to have fresh, organic produce. Anyway, I’ll provide a picture of this garden pest, along with an excerpt from Wikipedia about “control” when it comes to Japanese Beetles. If you enjoy gardening and you see these buzzing freaks enter into your green kingdom of vegetation, you may be interested in the following:

“Research performed by many US extension service branches has shown that pheromone traps attract more beetles than they catch. Traps are most effective when spread out over an entire community, and downwind and at the borders (ie, as far away as possible, particularly upwind), of managed property containing plants being protected. Natural repellents include catnip, chives, garlic, and tansy, as well as the remains of dead beetles, but these methods have limited effectiveness. Additionally, when present in small numbers, the beetles may be manually controlled using a soap-water spray mixture, shaking a plant in the morning hours and disposing of the fallen beetles, or simply picking them off attractions (that’s what I did this year), since the presence of beetles attracts more beetles to that plant.”

Read more about these annoying creatures, here: https://en.wikipedia.org/wiki/Japanese_beetle

At any rate, I’ll be on the lookout for these beetles next year and prepare to combat this garden pest without poisons; If needed, I may possibly bring a freakin' blow torch to the scene!

Update (11-9-2024): As the years went by, I ended up moving a few more times. Each place had their own pests, of course, but I've had less and less trouble with this type of beetle, even though they are still buzzing around profusely. This is an incidental discovery, by the way, but I planted a couple Nanking Cherry bushes/trees beside my garden a few years ago. Now, when these Japanese Beetles show up every year, they like 95% favor the cherry bushes as opposed to my garden. Since the birds eat all the tiny cherries they produce anyway, I don't mind a bit that these particular pests prefer to eat the leaves off of the cherry trees as opposed to my garden. It's a win-win-win. ---End of Update

---End of Post "Japanese Beetles - Garden Pest"

Saturday, November 6, 2021

Fastest Growing Plants for Indoor Mini Hydroponics


Unless you live in a tropical environment or close to a southern coastline somewhere (like Zones 8, 9, or 10), you more than likely have certain growing seasons in your area along with winter months where your garden tools collect dust in anticipation of Spring.  For some of you, it's the same type of anticipation during that time period, year after year, always waiting for the weather to warm up so you can get your garden started. 

I'm sure, because of this, that many of you have also planted stuff too early in the season before, only to have a frost come by and kill your plants, as well. This year, however, I did prolong things by having a Fall crop. After my summer garden was over, I plowed it all up, waited for the weather to cool, then planted some of the fastest growing cool weather crops: turnip greens and radishes. I must say, though, cool-season vegetables are limited, as for variety, in what you can grow; a lot of folks may not like those options. 

But have you ever thought about growing some of your edibles indoors? I know the technology has been around for a long while, but it has come a long way when concerning the mini hydroponics that you use for growing plants indoors. There are full-sized versions out there, too, albeit a bit too pricey for my liking. On this post, I'm talking about the mini, more compact versions of hydroponics along with some of the fastest growing plants that I've experimented with so far. Yeah, this is a Nature & Wildlife Blog, but that doesn't mean that the subjects are limited to outdoors, does it?

Anyway, I've recently purchased 2 indoor growing systems that use the modern LED lighting technology. To clarify, they would be better described as mini hydroponics. Why did I start out with 2? Well, I had an idea, which I will get to that in a few minutes. But first, I want to quickly cover the fastest growing plants I've encountered thus far while using this system. This list will be fairly small since I've only experimented with a few plants, but I have loads of seeds for a bunch of different plants, herbs, etc. It just takes time to let each one go through its growing cycle before you harvest and try different species next and so on. So far, I've found all the seeds I need for hydroponics from Amazon.com and Urban Farmer (www.ufseeds.com).

When it comes to lettuce, loose-leaf lettuce is by far the better choice as opposed to head lettuce for these mini, indoor setups. It really just doesn't appear to have enough room for big heads of lettuce.  The leaf lettuce, though, you can pick the outer leaves as you need them and they just keep growing and growing.  The highest quality lettuce I have tried thus far is the buttercrunch variety. It's a good thing this has been the fastest growing lettuce, because it has a nice buttery taste and a smooth texture that beckons for a variety of culinary uses. 

Next up is Arugula, which a lot of folks may have not ever tried. It adds a nice peppery or mustard-like flavor to salads and/or whatever else you like to use it on. This is one of the plants I have did a side-by-side comparison under the same lighting conditions, as a "soil vs. hydroponics" test. I must say, arugula appeared to have grown twice as fast using my mini indoor growing system when compared to traditional dirt mixtures. 

I would not normally try to grow tomatoes in one of these mini indoor systems using hydroponics, but I did find one variety that was perfect for this, which was the Tiny Tim Tomato. It's small, compact size with high yields is the perfect choice for these particular systems. Since this is a recent experiment, I can only gauge it by the first couple of inches of growth. However, I must say, it has been the fastest sprouting and growing tomato I have seen, as they normally start off really slow when using soil and normal growing elements outside.

This next one is well known for being one of the fastest plants for hydro growing platforms, and that is watercress. This is the only one I mentioned so far that I haven't tried yet, but thought I'd mention it anyway. For contrast, the slowest growing plants I've tried thus far in these water systems has been chives and bunching onion. I'm not saying they were ridiculously sluggish, but just slow compared to the others I've tested. 

Well, I saved the fastest (out of what I've tried) for last.  The Hong Vit radish is well known in the microgreen industry. They germinate and shoot up really quick, even under various conditions. I've seen experiments online where they compared hydroponics to soil while growing these. They used fertilizer in one water-based system and no nutrients in the other and the same for the soil - one using fertile, rich soil and one with poor soil quality. It seems that the Hong Vit grows fast in any of those conditions, but they thrived the most in hydroponics. Oh, by the way, this is not the type of radish that grows a root vegetable; it is used for the greens, stems, and sprouts.  One interesting thing to note, is that the Hong Vit, when young, appears to have a spicier taste when grown in poor conditions. I didn't use it for microgreens, but I picked mine in the semi-early stages; I guess you could call it baby Hong Vit. On a side note, they are really attractive and add some color to your growing area. They have a purplish to pinkish stem leading up to the green foliage. I've harvested a few rounds of this so far from my indoor setup, and they were all good albeit milder than I wanted them to be! I must have used too much fertilizer; ha!

Now that we have touched on the subject of microgreens, I suppose that these mini kits for indoor hydroponics would be suitable for those.  I must say, though, I think a person would be (if you are into the sprouts / microgreens thing) better off buying separate growing lights and just use those 1.5-inch Rockwool/Stonewool Grow Cubes Starter Sheets inside of large pans, sort of like baking trays, to use for microgreens inside your home. Of course, there are many different types of growing mediums to use in those water-based tray systems, but no matter what, growing microgreens is about as easy as it gets.  How can you screw-up while harvesting sprouts?

As for fertilizing your mini hydroponics system, the product I purchased came with 2 bottles that you mix with water. Since I bought 2 of them, I have 4 bottles of fertilizer so I should be good for quite a while. The setup I have come with Plant Food A and Plant Food B. Bottle A contains 9% N, 8% P2O5, 30% K2O, 3% Mg, .30% Iron, .06% Manganese, .005% Copper, .01% Zinc, and .1% Boron. Plant Food B contains 11.5% N (nitrogen), and 26% Calcium. Of course, you can purchase any type of fertilizer you want but, whatever you do, make sure it is formulated for hydroponics. Don't go dumping Miracle Grow into your indoor growing system. Trust me, I've read about some of those stories and, uh, those people didn't harvest very much to say the least. Don't get me wrong, Miracle Grow seems to work great when using in soil, but it is not recommended for these types of hydro growing systems. I know you're in a hurry to get those indoor crops, but try to calm down a bit; ha!

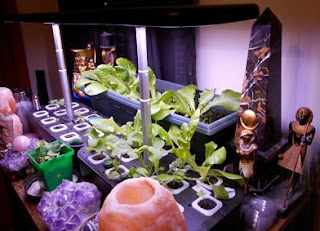
Oh, before I go, let me get back to explaining why I bought two of these indoor kits. It was a simple idea, really, which was to borrow the light from them! You see, if you have the room, setting up two of these systems side-by-side emits a good bit of light. So, I just stuck a long container filled with soil behind these, so I could grow even more stuff. You could also put plants in front of these, as well. Hey, I wanted to get more bang for my money, and this stuff works! I've really enjoyed this Mini Hydroponics thing thus far. Oh, to show what I'm talking about when it comes to borrowing light, I took a couple of pics a few moments ago.  Please note, I just recently harvested most of the plants, so it looks a little bare at the moment, but it won't be long before they are full again. The container with soil behind them is the ones I'm just going to let grow for a while before I harvest. I actually transplanted them from the water-based system when they were just little sprouts.


To show how fast these plants grow, this next photo is just 12 days later, after I took those other two, up above. Plus, I already picked some lettuce from there earlier that week. Ignore the little green pot, as I recently replanted some Hong Vit in there. Anyway, check out this progress after only 12 days:


Another good thing about this, is that the grow sponges and/or seed pods (whatever you want to call them) are fairly cheap for this. I've reused several of them thus far, but of course the ones you will use for transplanting or for extended growth will be a one-time deal. I've recently grabbed a bag of 50 for a little over 10 bucks; not bad at all. This thing is adjustable, too, so your plants have room to grow nearly 2 feet tall, if needed.

I didn't really mention herbs much on this post, but this thing would obviously be great for chives, basil, cilantro, parsley, oregano, or whatever you like. You can even grow flowers in there, as well. Maybe herbal flowers like Chamomile or Lavender? My indoor growing system has two lighting options: vegetables and flowers. Oh, make sure you keep enough water in there, as well, because the water pump could fail if you let it get too low.  This shouldn't ever be a problem because it would take a good amount of neglect to let it run that low, for sure.

One final thought about this: Even though I haven't used it for this yet, I can already see a huge advantage I'm going to have next year when starting my real garden outside. Certain plants just always seem to work better when transplanted, like peppers and tomatoes, for example. Well, next year I will harvest everything from this growing system at the end of winter and start all of my seedlings indoors, then transplant them into my outdoor growing spots after the last frost. Then, I will go back to growing random stuff indoors, as well. Man, this mini hydroponics thing is going to really work out nicely. Yeah, maybe I'll have the fastest growing garden plants next year as well; uh, I mean, hopefully. You never know about the weather anymore, so I won't get too cocky about it; ha!

Pictured below is the model I currently own. It is called the Ailess Pro, but there are many more models than that to pick from. Some larger, some smaller; some cheaper, some more expensive, etc.


"Click Here (Affiliate Link) to Shop Online for Indoor Hydroponics"

Image Credits: 1st & 5th image are Product Images - Fair Use; 2nd, 3rd & 4th images are my own photos - if you'd like to use them for something online, please provide a link back to this blog for credit; thanks!

Semi-related Links:

*Crimson Clover - Benefits & Reasons for Cover Crops

*Growing Dwarf Fruit Trees

---End of Post "Fastest Growing Plants for Indoor Mini Hydroponics"

Friday, November 5, 2021

Crimson Clover - Benefits & Reasons for Cover Crops


A lot of backyard gardeners probably don't think too much about the uses and benefits of cover crops albeit there are various reasons for such things. I mean, there are some people out there that plant a garden every year that don't even know about the benefits of crop rotation, either, but that's another subject entirely.  

Anyway, commercial farmers often use various types of plants for this, depending on their desired result. Some of the reasons are to help prevent soil erosion, add nitrogen to the soil (if you select legumes like peas and beans or crimson clover, for example), weed management, moisture regulation, food for farm animals (hunters and animal lovers may also use cover crops to feed local wildlife, etc.), and to provide future mulch and/or what some people call "green manure" along with a few other reasons. When I say moisture regulation, I basically mean they help with water infiltration. Have you ever seen certain areas of ground (especially compacted soil) that always just puddles up even with the slightest bit of rain? Yeah, I'm talking about the opposite of that...

I'm not going to cover all of the different aspects of cover crops on this post, as it will be just a general guide for the person with a small to medium-sized garden. When it comes to that, the main reasons are to benefit soil health, add nitrogen, and attract pollinators to the area. Most folks with normal sized gardens don't have to worry with weed control (if you put in the work), moisture regulation or soil erosion, I wouldn't think. Unless you are a farmer, most people do not have cows and goats roaming around in their yard either, so I doubt the average person will need cover crops to help feed their livestock. However, I have known a few people out in the country that have fenced-in goats so they never have to mow their yard, but those animals will eat any type of vegetation they can get into their mouth. Trust me, I've been around goats before, and they are not picky eaters.  Pretty much, if it's not meat, they are interested. I still remember this one goat in particular that even tried to smoke a cigarette that the person next to me was holding; ha! Wait a minute, I actually have a picture of this bizarre "smoking goat" from the past, and I will post it below:

Okay, now back to the main subject...

Out of all the reasons and benefits for cover crops, when it comes to the average gardener, the improved soil quality via organic matter recycling within the soil along with the fertilization that occurs by way of nitrogen release from legumes, are the main advantages of this. There are many different cover crops you can choose from, depending on your needs, but for the typical gardener we will go with legumes. Instead of using up your seeds from your leftover beans and peas, I recommend going with clovers. Plus, they are also normally a good bit cheaper than the seeds for food crops that I just mentioned. In this particular case, I selected the easy to grow, highly attractive Crimson Clover.

Its scientific name is Trifolium incarnatum (not that most people would call it that), but some people do refer to it as the Italian Clover, as well. A quote from Wikipedia states, "[...] a species of flowering plant in the family Fabaceae, native to most of Europe. It has been introduced to other areas, including the United States and Japan. The plant is widely grown as a protein-rich forage crop for cattle and other livestock and is suitable to be made into hay. It is commonly grazed by domestic and wild ruminants. It is often used for roadside erosion control, as well as beautification. Crimson clover's flowers and sprouts are edible. They can be added as an ingredient in salads, sandwiches, etc." I selected that excerpt because it mentioned some of the other benefits besides its main reasons for the backyard gardener, which is to mostly fix the nitrogen in the soil and improve the quality of your growing substrate.

From the Amazon product page (with a minor edits): "Crimson clover is a winter annual with dark green, oval leaflets containing no V-shaped water mark making it easy to distinguish from other annual clovers. Crimson prefers well-drained soils and a pH between 5.0 - 6.5, but it is not extremely picky. It is the fastest growing of the annual clovers, easy to establish, and handles shade well. Crimson clover is a cheap, easy, productive, tasty, cool season grazing material for deer. It starts fast, withstands continuous grazing and produces a consistent, heavy seed crop with good reseeding potential."

If you live in the southern part of the U.S., the Crimson clover is an excellent choice for a cover crop to use after your summer & fall harvest has been completed. I planted mine where I live in September this year. The Crimson clover, unlike some clovers, can withstand freezing temperatures and does really well in southern winters. The timing of this crop is most likely different for the northern region, but it is really beautiful when it blooms, nonetheless. Well, I think I'll drop down another image of these attractive clovers and provide a link in case you're interested in this type of plant.


Image Credit: Amazon.com - Product Images - Fair Use

Shopping (Affiliate) Link:


Other plant-related posts from the Wildlife & Nature Blog:


---End of Post "Crimson Clover - Benefits & Reasons for Cover Crops"

Friday, March 13, 2015

Growing Asparagus: Is it worth the time & money?

This will now be a 2-part post since I recently deleted an old website of mine. I've been re-posting articles amid multiple blogs of mine lately, and have combined some posts that are related, etc.

Part 1: "Growing Asparagus: Is it worth the time & money?"

This is the question that I have been pondering today, when thinking about the upcoming garden season this year. I was thinking about trying something different, in addition to the usual crops that I plant every year. First of all, it seems that a lot of people don't like to eat asparagus, for whatever reason, but this stuff tastes great to me! Anyway, a few years ago, I had this same dilemma, but it wasn't about the money or time involved with setting it up, but more about the time it takes to get a good harvest. I move around a lot, it seems, so that is the heart of my quagmire.

Asparagus, when starting from seed, will take about 3 years to produce a decent amount of yield. If you buy 1-year-old crowns, you'll still have to wait a couple growing seasons for steady production. When you buy the expensive 2-year-old roots/crowns, you still won't have very much yield (asparagus) during the first growing season when compared to how much money you spent on the plants. Hmm...

If you are at a location that you are at least semi-certain you are going to be at for a while and have the extra room for such things, asparagus seems to be a good choice. Around here, they sell it for nearly 3 dollars a can in the grocery section and I don't even know how high it is in the produce section. People claim that it is so much better fresh, right out of the garden (like most things), but I'm totally satisfied with canned asparagus except for, well, the price. The good thing is, asparagus seems to be fairly easy to grow, going by the last few videos I have watched today.

Oh, I forgot to mention: Once you get your asparagus planted and thriving, you shouldn't have to worry about replanting any time soon. On average, it will keep coming back season after season for 15 to 20 years. I've even read that it can last for 50+ years! However, this means nothing if you move around a lot! This is also the reason why I said if you "have the extra room for such things," because wherever you plant them at, you will be dedicating that area just for this particular crop.

I could write a long list of the health benefits along with certain odd qualities that asparagus has, but I'll spare you from the verbiage. I'm just more or less talking to myself on here about whether or not I should try growing this awesome perennial vegetable. From the green varieties to purple and white, you can find it all online. I will at least provide something useful on this post, and add some quality links below...

An easy-to-follow video that shows just how easy it is to grow asparagus, if you have the time and money for it: http://perpendicularity.org/blog/2012/07/30/video-growing-asparagus-is-easy/ [Link is no longer active since I deleted that website, but I re-posted that page at the bottom of this post.]

Additional reading material about asparagus:
www.nytimes.com/2003/06/01/nyregion/cuttings-why-asparagus-belongs-in-the-flower-bed.html (link has been deactivated due to a subscription request on the web page)
en.wikipedia.org/wiki/Asparagus

Image Credit: Wikimedia Commons - Source = Wiki link is already provided above.

---End of Part 1 "Growing Asparagus: Is it worth the time & money?"

Part 2: "Video: Growing Asparagus is easy!"

I recently watched a video about growing asparagus and just how easy it is to grow.  All of this time, I have thought it was one of those crops that involved special care, a lot of money, and time.  The reason why I thought that way before, is because I evidently read some crap on the web a few years back, that most likely spawned from a few idiots that were just typing poppycock in hopes they would make a few bucks via their advert networks.  Anyway, in a moment, I’ll provide a video that explains in a simple fashion, just how easy it is to grow.

I already knew that asparagus has the ability to grow year after year without the worry of having to replant, but I’ve heard some folks act like some years you couldn’t get any yield and would have to let the plants “strengthen.”  Going by this video, the yield picks up the second year and thrives, under normal circumstances, for many more years to come.  Of course, you need to take care of the soil and make sure it is fertile enough, has enough nitrogen, keep it free of weeds and grasses, etc., or else this little growing endeavor may not be worth it.

Another well-known fact about asparagus that isn’t included in this particular video, is the various health benefits a person can get by eating it.  There are medicinal properties as well, but instead of me turning this “how to grow” post into a “health benefits of” article, I’ll just drop down a Wiki link, so you can get started:  https://en.wikipedia.org/wiki/Asparagus

Random Tidbit: “Asparagus is a useful companion plant for tomatoes. The tomato plant repels the asparagus beetle, as do several other common companion plants of tomatoes. Meanwhile, asparagus may repel some harmful root nematodes that affect tomato plants.”

You can always search the web for more info, but try to only read from reliable sources.  When it comes to cooking this stuff, I’ve seen people steam it, bake it, grill it, use it in stir-fry, and even eat it raw.  Hell, even the store-bought asparagus out of a can taste great to me!  I especially like eating asparagus when I’m in a meat mood, let's say steak, and all I mainly want is to eat the meat but need something else to add to my plate for balance.  This is a healthy choice for a 2-course meal because it is power-packed with nutrients, and this is what I mean by balancing out a meal that lacks variety.

Oh, when I do eat asparagus out of a can, all I do is put it on a plate, drizzle it with a little canola oil and sprinkle some seasoned salt and black pepper on it, throw in the microwave for about 45 seconds, and presto!

Now, let's get back to growing asparagus and the video I’m about to provide, to show how easy this is.  Anyway, in a thumbnail, the guy just dug a few trenches about 8 inches deep, dropped in some 2-year-old asparagus crowns, keeping them about 8 inches apart, covered them back up with dirt, and his crop took off within weeks.  Okay, at any rate, that’s enough rambling from me.  
Check out the video, below:


Image Credit: Asparagus Steamer - Product Image - Fair Use - Amazon.com

—End of Part 2: “Video: Growing Asparagus is Easy!”

---End of Post "Growing Asparagus: Is it worth the time & money?"

Sunday, March 8, 2015

Dick Proenneke: Alone in the Wilderness

"Alone in the Wilderness" is the story of Dick Proenneke living in Alaska at Twin Lakes. This film shows a man living on pristine land that is unchanged by man, while being alone in a type of wilderness that few people would dare to challenge. Dick selected this type of peaceful setting even though it had brutally cold winters in which provided the serenity of stillness, at times. This DVD is so enjoyable to watch and it has a calming effect to it, if you enjoy this type of stuff. Just to see a person living off the land (for the most part - outside of the occasional delivery of certain products like granulated sugar, etc.) and having to put in all the hard work like cutting all of their wood, building their own cabin, making their own utensils while catching their fish, killing certain wild animals and growing their own food, all while documenting and narrating the chain of events during the process, is truly aesthetically pleasing to watch. For one to achieve such things, not only did a person need to be an excellent craftsman (and a great carpenter he was), but they had to also be very content with one's own thoughts and company...

This was a dream come true and a lifetime challenge for Dick Proenneke, that he ultimately lived out. What was going to be a 1 to 1.5 year project, turned into 30 years of outdoor peacefulness and pleasant, self-fulfilling adventures. He didn't leave the wilderness of Twin Lakes until he was 82 years old! He mentioned that the -40 (Fahrenheit) and -50 degree winters were starting to get hard on his joints. After returning to civilization at age 82, he died 4 years later from a stroke, at age 86.

Although this movie will not be for everyone, since not everybody seems to enjoy nature nowadays, if you are looking for some soothing outdoor explorations in a beautiful Alaskan setting, you'll love this flick! Alone in the Wilderness is the only film that featured Dick Proenneke that I have watched, but they also made a couple more (not including the Part 2, to this one) that was related to this one: "Alaska, Silence and Solitude" and "The Frozen North." The DVD for this show seems to be priced fairly high at the moment, so you may want to watch a short clip on YouTube (it skips around through various parts and leaves out most of the film), to get a better sense of what type of flick this is and/or to see whether or not this style of documentary is for you: www.youtube.com/watch?v=iYJKd0rkKss

Shopping (Affiliate) Link: 

"Click Here for Dick Proenneke DVDs on Amazon"

Image Credit: Fair Use - DVD Cover - Amazon.com

---End of Post "Dick Proenneke: Alone in the Wilderness"